Additional Scanning Features
SpyHunter incorporates several advanced options designed to give more control to the user over the scanning process.
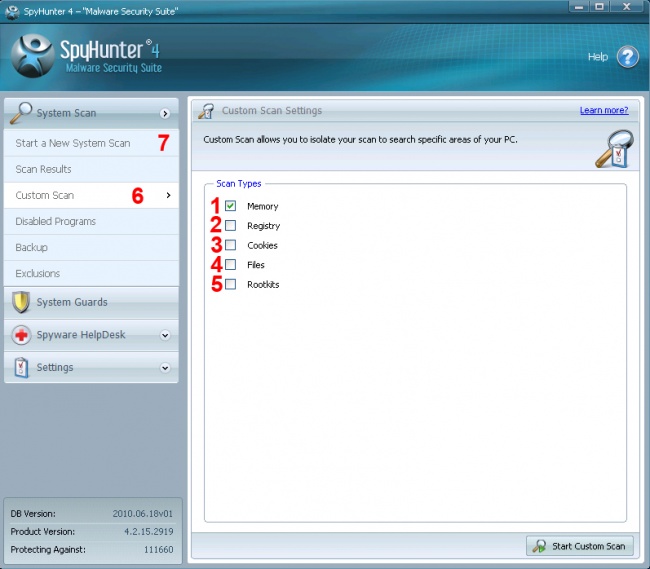
Custom Scan (7) - With Custom Scan you can save time by limiting your scan to specific sections of your computer system. If you click on Custom Scan under the System Scan menu, you will be provided with the option of partitioning your scan by selecting which section of your system you want scanned.
You can select from any of the following Scan Types: "Memory" (1), "Registry" (2), "Cookies" (3), "Files" (4) or "Rootkits" (5). You also have the option of choosing which fixed drives you want analyzed. Once you have selected the individual area(s), you can click on "Start Custom Scan" (8) in the lower right corner to begin the custom scan.
As your scan progresses, the progress bar will gradually fill. To stop any type of scan, simply click the "Stop Scan" button. A Custom Scan may take a fraction of the time that a Full Scan would take, but it may not catch some residuals left behind by programs that you decide to remove.
To start a basic SpyHunter scan, just click the "Start New Scan" button (identified by the number 7 in the screen shot above). This will scan your computer's memory, registry, cookies, and files with just one simple click.
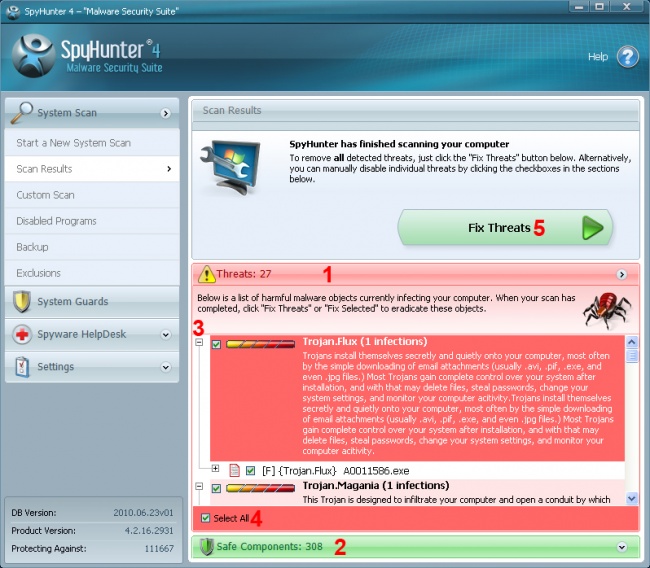
When the scan has completed, the objects found by SpyHunter will appear in the Scan Results panel. Additional information about each object will be listed below in the Threat panel (1). Information about the program that the object is associated with will be displayed when you click the "+"symbol next to each object (4). In some instances, especially regarding very recently added items, information will not be available until the next definitions update.
To select an object for removal, just click on the checkbox next to its name in the Threat pane. You can select and deselect any items listed. We have included a convenient "select all" feature that will allow you to check or uncheck all items picked up by the scan. To utilize this feature, simply check the "Select all" checkbox (5).
Once you have selected which items you would like to remove, click the "Next" button (6). Any items that you remove will be placed in SpyHunter's quarantine area found in the Backup Panel. If, at any time, you would like to restore previously removed items to your system, you can do so through SpyHunter's Backup feature through the Backup menu.
That is it! After following these basic steps, you will have completed your first SpyHunter scan!