File Shredder
RegHunter has the ability to securely and permanently erase data with its file shredder component. When you use normal methods to delete Windows files, data remains on your computer, which can be easily recovered with specialized software. RegHunter’s File Shredder is designed to completely eradicate sensitive information so that it can never be recovered. File Shredder can securely remove specific files, or securely erase an entire hard drive.
IMPORTANT NOTE: Once you shred a file with RegHunter, there is, by design, no way to recover the deleted information. Please be careful when using this feature.
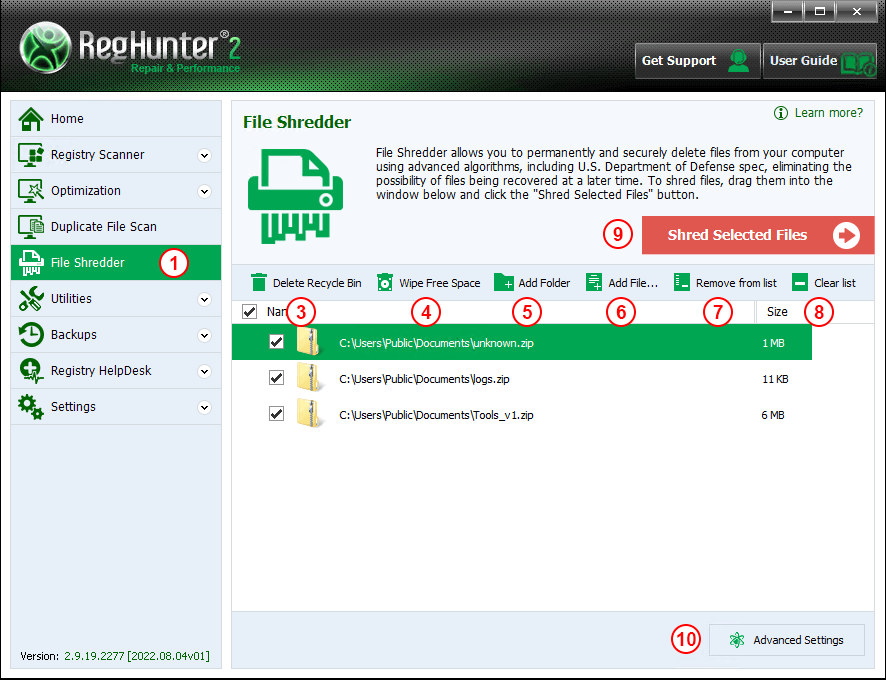
As file shredding is an irreversible process, you must first select which files you would like to shred before the actual shredding completes. There are three ways that you can add files to the shredding queue: 1) you can open the RegHunter “File Shredder” panel (1) and simply drag and drop any files that you wish to shred into the window; 2) in the RegHunter “File Shredder” panel, click the “Add Folder” (5) or “Add File” (6) icons to select a folder or file(s) to add to the shredder queue; 3) if RegHunter secure deletion is added to the Windows shell menu (see “File Shredder Settings,” below), simply locate a file or folder in Windows Explorer, right click the object, and click “Add to RegHunter File Shredder” in the menu that appears.
Once you have added all files that you wish to shred to the queue, you must click the “Shred Selected Files” (9) button to complete the file shredding process. You will be prompted once again to confirm that you wish to irreversibly shred the selected files and
folders.
You can remove any items from the queue by selecting the file(s) or folder(s) and clicking the “Remove from list” (7) button. You can remove ALL items from the queue by clicking the “Clear list” (8) button.
You can also use File Shredder to securely erase all files found in your Windows Recycle Bin, completely preventing recovery. To do so, simply click the “Delete Recycle Bin” (3) button in the “File Shredder” panel. You will be prompted once more to confirm deletion.
When you use the standard Windows file deletion commands, the original data that you have deleted is de-referenced from the Windows file system, but the actual data remains until it is written over by the operating system. To prevent an unauthorized person from viewing this data, we recommend that you use the File Shredder “Wipe Free Space” button (4). Clicking this button will securely wipe the empty space on all selected drives. If you have not selected any drives to wipe free space on, you will be directed to the “File Shredder Settings” to select drives before you can use this feature.
The “Wipe Free Space” feature can be very useful to permanently erase all traces of data stored on an external hard drive that you are planning to sell or donate. To securely clean the external drive, first delete all data from the drive, and then use the “Wipe Free Space” feature to completely eradicate any data that was ever stored on the drive, making it safe to transfer the drive to an unknown party.
Click the “Advanced Settings” (10) button to open the File Shredder Settings section. These settings can be used by advanced users to select different file deletion algorithms and behaviors.
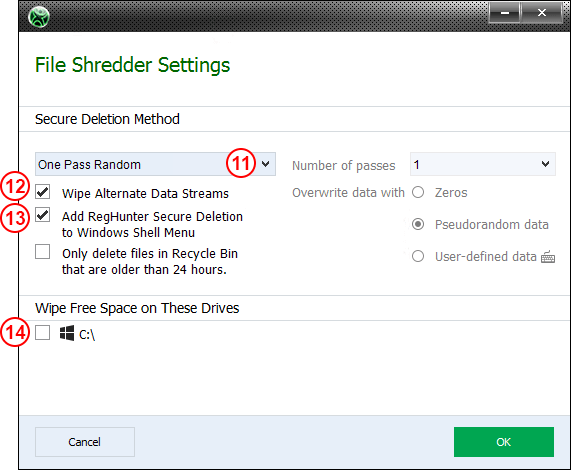
File Shredder Settings
RegHunter allows you to choose from a variety of deletion algorithms, including DoD, NIST, and NSA standards. To select a different secure deletion method, simply select it from the “Secure Deletion Method” drop-down menu (11). You can also select the “User Defined” option, which will allow you to manually select the number of write passes, and what data will be written over the data you wish to eradicate.
You can also configure the File Shredder to automatically wipe Windows Alternate Data Streams for additional security. (12)
If you check “Add RegHunter Secure Deletion to Windows Shell Menu,” (13) a right-click menu option will be added to the Windows shell, which allows you to immediately add files to the File Shredder queue directly from Windows Explorer. After you have added files to the queue, you will need to go to the RegHunter File Shredder panel (1), and click the “Shred Selected Files” (9) button to complete the shredding operation.
You can also select which disk drives to wipe free space on ” (14). See the File Shredder Panel for instructions on how to wipe free disk space.