How To Use SpyHunter's Scan Scheduling
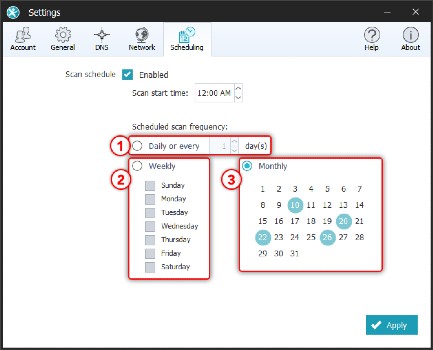
SpyHunter incorporates an advanced scan scheduling feature, which allows you to run a scan at a pre-set time, even if you are away from your computer. Using the scan scheduling is very intuitive. You can access the feature by clicking the "Settings" menu option in SpyHunter's main window and then clicking the "Scheduling" tab. If the "Enabled" checkbox is checked, this means that SpyHunter's scan scheduler is currently active. The parameters of the currently active schedule will be displayed here. To deactivate scan scheduling, uncheck the "Enabled" box.
Note: Please click the "Apply" button, at the bottom right of the "Scheduling" tab, to finalize any changes that you have made to the scan schedule, including enabling or disabling the feature.
Note: By default, the scan scheduling feature is not enabled. This is to allow users to select and activate a scan schedule that fits their needs and preferences.
Use the "Scan start time" to set a time of day at which your scheduled scan will run. To set the time, you can click on the "hours," "minutes," and "AM/PM" sections of the field and either type in a valid value or select a value using the up and down selection buttons next to the field.
You can choose from the following schedule patterns: "Daily," "Weekly" and "Monthly:"
- Daily Scan - If you opt for a daily scan, you can choose to run the scan every day or at a set interval of days (for example, every 3 days). To set up SpyHunter to scan every day, select the "Daily" radio button and enter "1" in the "Day(s)" select box.
- Weekly Scan - To set up weekly SpyHunter scans, select the "Weekly" radio button and select the day of the week (or multiple days) on which you wish SpyHunter to scan your system.
- Monthly Scan - To set up monthly SpyHunter scans, click the "Monthly" radio button and select the specific day (or multiple days) of the month on which you wish SpyHunter to scan your system.
Some Common Use Cases:
Note: SpyHunter will display the "Scan start time" dialog based on your Windows clock format settings. For example, if your clock is set to 24-hour time format, the settings in the cases below will be slightly different. For ease of explanation, we have assumed 12-hour time settings (AM/PM) in the examples below.
Option 1: Set Up SpyHunter to run a scan at 02:00 AM each day
- First, make sure that the scan scheduler is "Enabled" by verifying that the checkbox next to the "Enabled" option is checked. If it is unchecked, click the checkbox to check it.
- Next, click the "Daily" radio button to select it (the "circle" next to "Daily" will appear filled in, when selected). The drop-down next to the "Daily" button should display "1" day(s). If it does not, please set it to "1" by clicking in the box and typing "1."
- Now, click on the "hours" section of the dialog next to "Scan start time" and type in "2". The "minutes" section should be set to "00". If it is not, click on the "minutes" section and type "00". Also, make sure that "AM" is displayed next to the time, if present. If "PM" is displayed, you should change this to "AM" by clicking on it and pressing the "A" key.
- After you have modified all settings, please click the "Apply" button to activate the new schedule.
Option 2: Set Up SpyHunter to run a scan at 10:00 PM every Friday
- First, make sure that the scan scheduler is "Enabled" by verifying that the checkbox next to the "Enabled" option is checked. If it is unchecked, click the checkbox to check it.
- Next, click the "Weekly" radio button to select it (the "circle" next to "Weekly" will appear filled in, when selected).
- Now, check the checkbox next to "Friday" so that it displays a checkmark. No other days of the week should be checked.
- After this, click on the "hours" section of the dialog next to "Scan start time" and type in "10". The "minutes" section should be set to "00". If it is not, click on the "minutes" section and type "00". Also, make sure that "PM" is displayed next to the time, if present. If "AM" is displayed, you should change this to "PM" by clicking on it and pressing the "P" key.
- After you have modified all settings, please click the "Apply" button to activate the new schedule.
Option 3: Set Up SpyHunter to run a scan at 05:00 AM on the 1st and 15th day of every month
- First, make sure that the scan scheduler is "Enabled" by verifying that the checkbox next to the "Enabled" option is checked. If it is unchecked, click the checkbox to check it.
- Next, click the "Monthly" radio button to select it (the "circle" next to "Monthly" will appear filled in, when selected).
Now, click on "1" and "15" in the calendar displayed below "Monthly" to select these days. A circle will be displayed around the day number, when it is selected. No other days should be selected. - After this, click on the "hours" section of the dialog next to "Scan start time" and type in "5". The "minutes" section should be set to "00". If it is not, click on the "minutes" section and type "00". Also, make sure that "AM" is displayed next to the time, if present. If "PM" is displayed, you should change this to "AM" by clicking on it and pressing the "A" key.
- After you have modified all settings, please click the "Apply" button to activate the new schedule.
Note: Your computer must be powered on at the time that your scan is scheduled to run. If the computer is not turned on, the scan cannot execute.
