How to fix Kernel Security Check Failure error in Windows 10
 Powering up a Windows 10 PC should usually cause no problems. Sometimes, however, you get the Blue Screen of Death (BSoD) instead. The blue screen only appears when one out of a few specific errors occurs on your system. In this guide, we shall outline the steps you need to make if the so-called Kernel Security Check Failure accompanied by the 0x000000139 error code is the reason for your BSOD.
The Kernel Security Check Failure may be due to:
- Loose cable connections
- Data corruption
- Failed hardware compatibility check (HDD, RAM, drivers, etc.)
- Malware attacks.
Loose cable connections may refer to your removable devices. When attached to your PC, they communicate with your Windows 10 OS the same way as your internal hardware. Therefore, a compromised connection may prevent your OS from recognizing your external equipment. Data corruption usually occurs as a result of a malicious infection that tampers with the code of your original data rendering the latter unreadable by the application you use to access it. Hardware compatibility issues, on the other hand, often stem from OS system upgrades as the most recent build of Windows 10 may, for example, require that you update one or more of your drivers, as well.
How Do I Get Rid of That “Kernel Security Check Failure” Error?
Since the Kernel Security Check Failure error may show up on your screen for several reasons, you can't pick a single specific method to solve the problem. Instead, you may have to adopt a multi-pronged approach by performing one action at a time until you figure out what works and what doesn't.
Note! If you happen to have created a system restore point before you started having the Kernel Security Check Failure show up on your screen, you may be able to restore your PC to a previous stable state. Otherwise, go through the steps outlined below.
Step One: Power Off and Detach Removable Devices
If you get the Kernel Security Check Failure BSOD, you may need to force a system shutdown by pressing and holding the Power button for some time. Then, strip your system of any detachables — external HDDs, SD cards, headsets, speakers, Bluetooth devices, or optical drives — and only keep the bare-bones peripherals — your monitor, mouse, and keyboard. Make sure, however, that the latter are all firmly connected to your PC.
Note! If you have an internal DVD/Blu-Ray optical drive with a CD/DVD/Blu-Ray inside the tray, eject the media manually by placing a needle into the minuscule round hole on the front panel. Then, push the now empty tray with your hand to close it.
Step Two: Remove Recently Installed Programs and Disable Overclocking (If Activated)
Look at the list of installed programs on your Control Panel and start removing recently installed programs because one of them might have triggered the Kernel Security Check Failure. If you have a third-party antivirus program on your machine, either uninstall it or disable Windows Defender to avoid any potential interference. Also, make sure to disable any CPU overclocking you may have applied beforehand.
Step Three: Update Your Windows 10 OS and Your Drivers via Windows Update
Should a recent Windows 10 Update cause BSoD-related issues, Microsoft swiftly releases a new one to fix them. Check your OS for pending updates to make sure you've got the latest one installed. To check for updates, go to Start Menu -> Settings -> Update & Security.
Step Four: Inspect the RAM Module(s) on Your PC Motherboard
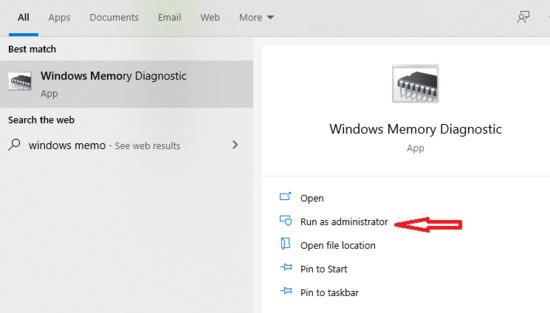
Even though each motherboard features stable clamps for keeping the RAM sticks in place, sometimes these clamps may weaken their grip. That's why you should regularly examine them provided that you have had previous experience of assembling a PC System. If you are not willing to open your PC case, run the Windows Memory Diagnostic Tool as administrator and pick the recommended Restart now and check for problems option.

If the diagnostic test reveals any RAM errors, you may still need to check whether your RAM modules lie firmly in their dedicated sockets on the motherboard. Finally, you may need to replace them with new ones.
Step Five: Run the Windows System File Checker Utility
Microsoft's System File Checker (SFC) is a useful tool that can help you find and fix any corrupt Windows system files. To run the tool:
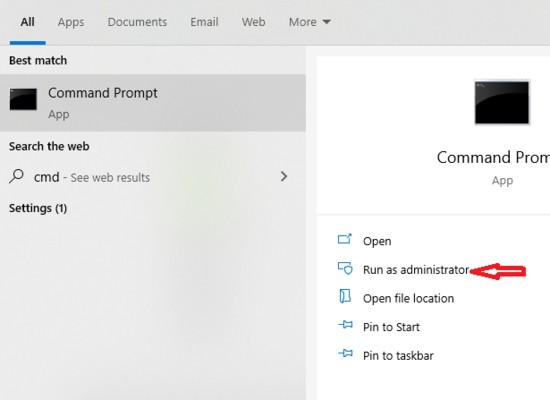
- Type cmd into the Windows 10 search box. To open the search box, click on the magnifier icon located right next to the Windows Start menu. This query should bring the Command Prompt Desktop app as the best match for your search.
- Click on Run as administrator (as shown on the screenshot below) to open the Command Prompt console.
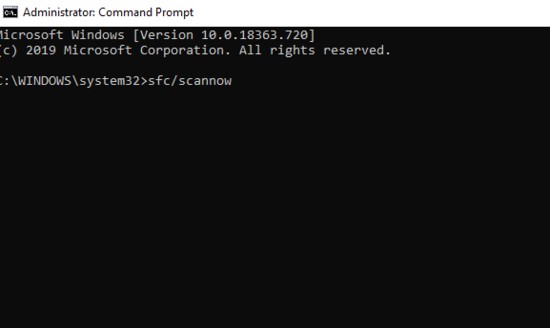
- Type in the sfc/scannow command, press Enter to launch the tool and wait for the results.
Step Six: Check your HDDs for System Errors
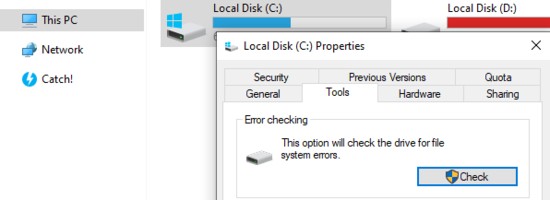
To check your system drive for errors, right-click on the Windows (C:) icon, select Properties -> Tools -> Check.
Step Seven: Reset Your PC to Its Factory Settings
If none of the steps outlined above works, you may have to go for a factory reset. However, make sure to back up your data on external media first! To perform a Factory Reset:
- Go to Start Menu -> Settings -> Update & Security
- Click on the Recovery tab on the left, then select Reset this PC
- Choose to keep your files and proceed with the Factory Reset.
As an alternative to a PC reset, you may opt for a clean installation of your Windows 10 OS from a DVD/USB drive.