How to Fix "Your Mailbox Has Been Temporarily Moved" Error
 “Your Mailbox Has Been Temporarily Moved on Microsoft Exchange Server” is a notification you may get on your screen if you have a valid Office 365 subscription and use Microsoft’s Outlook application in particular. It may either be indicative of a corrupt Microsoft Exchange profile or the mere result of your mailbox having migrated to an alternate platform. The notification comes from Microsoft Exchange and shows up in a dialog box (see image below) that prompts you to either:
- Work online with the temporary, yet incomplete mailbox.
- Or work offline with your old, complete inbox.
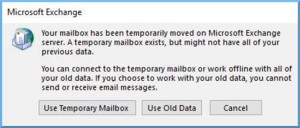
Image Source: NucleusTechnologies.com
The new temporary mailbox only contains a portion of your mail archive, though. If you accept to use it, you will be able to send and receive new messages, but you will lose an unknown number of your old emails, and you will NOT be able to recover them at a later stage. In case you need your old data in full, you could go for the “Use Old Data” option, but then you will neither submit nor retrieve any new mail. The box does not provide a setting that would allow you to exchange real-time email communication and access your complete archive at the same time.
The guide below may help you break this deadlock provided that you follow the steps one by one. Before you proceed, however, you have to:
- pick the “Cancel” option when the box above shows up on your screen
- back up your Outlook data
- run the Windows Update tool and apply pending updates (if any).
Step One: Remove All Outlook Profiles Bar Your Primary One
Normally, you would do perfectly fine with a single email account. However, if you've got two or more mail profiles, you need to apply some settings to guarantee their harmonious coexistence. Yet, maintaining multiple email profiles may sometimes cause interference, which in turn leads up to the "Your Mailbox Has Been Temporarily Moved" message. That is why you may need to reduce your Profiles list to the bare minimum. To do this, open Control Panel -> Mail -> Show Profiles -> Remove Selected Profile (see images below).
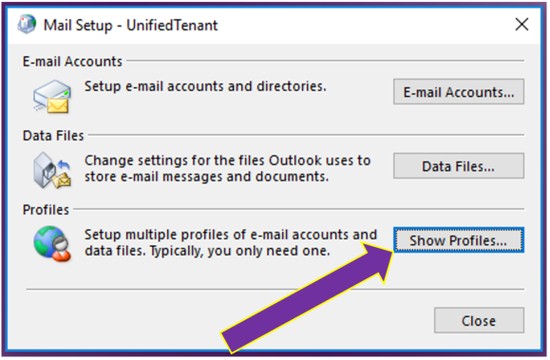
E-mail Profiles
Image Source: Minnesota State University
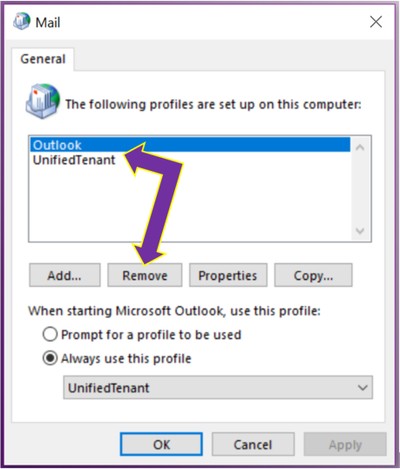
Remove E-mail Profiles - Image Source: Minnesota State University
Note! Before you remove a profile, make sure to export the offline cached contents associated with this account when Microsoft Outlook prompts you to do that in a dialog box which looks like the one below:
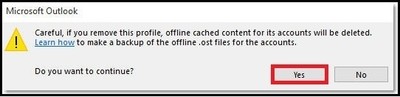
Cached content backup - Image Source: systoolsgroup.com
Once you have deleted all your secondary profiles, relaunch Microsoft Outlook. If you no longer see the “Your Mailbox Has Been Temporarily Moved” message on your screen, you have fixed the problem. However, if the box is still there, proceed with the next step.
Step Two: Turn On the Outlook Cached Exchange Mode
If you have a valid Microsoft 365 subscription, you must also have an active Microsoft Exchange account accessible via Outlook. Turning on the Cached Exchange Mode downloads a copy of all incoming and outgoing emails on your PC. Not only do you get fast-track access to your data in the event of poor Internet connection, but also regular server updates. Typically, the Cached Exchange Mode should be set to “ON” by default. Otherwise, open Control Panel -> Mail -> Email Accounts -> Select Account -> check the box beside “Use Cached Exchange Mode”.
This step is identical to the one preceding it. You need to open the Mail tool from your Control Panel. Rather than picking up the Profiles list this time, you should now opt for the "Email Accounts" icon (see Email Profiles image above) to see the Account Settings box such as the one below.
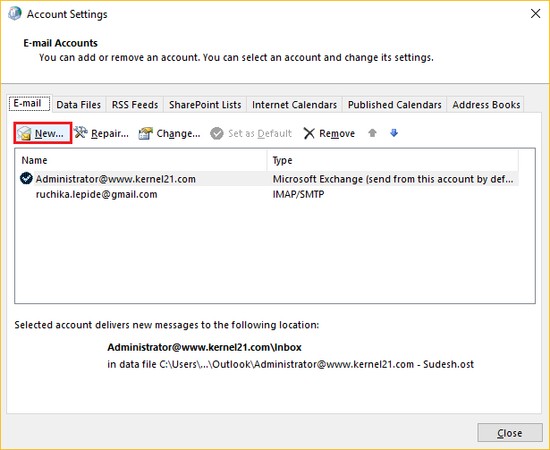
Account Settings - Image Source: NucleusTechnologies.com
Double-clicking on the selected account calls up the Microsoft Exchange Server settings for your account, which allows you to turn the Cached Exchange Mode on or off.

Cached Exchange Mode Settings - Image Source: NucleusTechnologies.com
Unless you have already enabled the Cached Exchange Mode at an earlier stage, put a tick in the box beside it to activate it. Otherwise, uncheck the icon, then recheck it and click "Next" to follow the closing instructions. Once you have completed them, relaunch Outlook. The “Your Mailbox Has Been Temporarily Moved” box must have disappeared by now. If the latter’s still there by any chance, you may resort to setting up a brand-new profile or changing the name of the current Outlook Folder in the AppData directory. These two options would solve the problem if it stemmed from corrupt files in the original Outlook folder.